Feedspace Home Dashboard

How to Manage Branding Assets in Feedspace

Last updated on September 29, 2025

Overview

Branding is an important part of your identity, and Feedspace allows you to customize the look and feel of your reviews and testimonial pages through Branding Assets.
These settings are applied across your workspace by default and will be reflected in:

  • Wall of Love
  • Page Designs

With Branding Assets, you can ensure all your review pages align with your company’s visual identity.

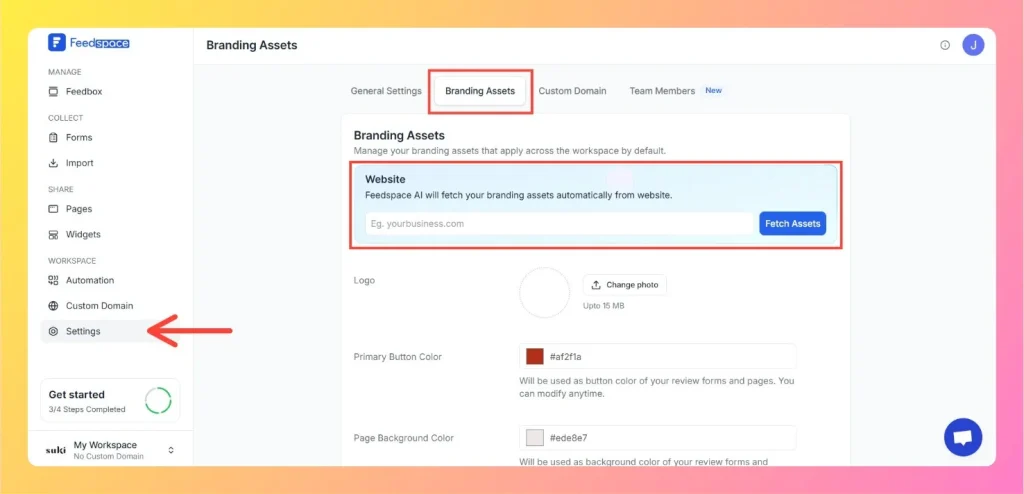
Step 1 – Navigate to Branding Assets

Step 2 – Add Your Website

  • Enter your website URL.
  • Click Fetch Assets to allow Feedspace AI to automatically pull your brand colors and logo.

Step 3 – Customize Branding Settings Manually

You can also manually configure the following:

  • Logo
    Upload your company logo (up to 15 MB). This will be displayed on your review pages and widgets.
  • Primary Button Color
    Define the color of action buttons (e.g., “Submit,” “View More”).
  • Page Background Color
    Set the overall background for your review forms and testimonial pages.
  • Primary Text Color
    Choose the main font color for headings and important text.
  • Secondary Text Color
    Used for subheadings and supporting text.
  • Card Background Color
    Controls the background color of each review/testimonial card.
  • Card On Hover Color
    Select the color effect when users hover over a review card.
Click on Settings From Left Sidebar

Step 4 – Save Your Changes

  • Once you’ve set your branding preferences, click “Save Changes”.
  • All updates will automatically reflect in your Wall of Love, pages, and widgets.

Benefits of Branding Assets

  • Maintain consistent branding across all review displays.
  • Enhance trust and professionalism with personalized colors and logos.
  • Provide a seamless user experience that aligns with your business website and brand identity.

Now your reviews and testimonials will always look on-brand with minimal effort!

You might also find helpful

How to Add a Custom Domain in Feedspace

Overview Adding your own custom domain to Feedspace helps reinforce your brand and may improve traffic. Below is a simple, step-by-step walkthrough to get your custom domain up and running. Step – 1 Log into Feedspace Go to Feedspace and log into your Feedspace account. Step – 2 Navigate to...

How to Create a Wall of Love Page in Feedspace

Steps to Create a Page Log into Feedspace Sign in with your account credentials. Go to Pages From the left sidebar, click Pages. Create Page Click Create Page. This opens the creation screen with some reviews auto-selected in the space. Select Reviews Go to the Select Review page and choose...

How to Create a New Workspace in Feedspace

Overview Organize your content effectively by creating separate workspaces—whether by project, client, or campaign. Here’s how to set one up: Step – 1 Log into Feedspace Visit Feedspace and sign in using your account credentials. Step – 2 Click “Create New Workspace” From the left-hand sidebar, select Create new workspace to begin setup. Step – 3...